X × SyncX
Back up and export your X (Twitter) bookmarks and likes
Keep a searchable copy of your X bookmarks and liked posts on your Mac, then export them as CSV or JSON. SyncX checks for new saves on your schedule and brings older bookmarks and likes into the same local library.
curl -fsSL https://syncx.cc/install.sh | shHow it works
How to back up X bookmarks and likes automatically
- 1
Connect your X account
Install SyncX on an Apple silicon Mac. Open Collect, add a collection and choose X. Sign in through the dedicated browser window, or explicitly import an existing X login.
- 2
Select Bookmarks and Likes
Choose your own account and enable Bookmarks, Likes or both. Posts and replies are separate choices. Pick one schedule for the account; the default is every 12 hours.
- 3
Choose what to save
Enable images and, if you want offline video, videos. Confirm to start the first collection. Older bookmarks and likes arrive in batches; Collect shows progress and any login problems.
Keep SyncX running on your Mac for scheduled collection. In Collect, expand the account to change its frequency or run Collect now. The website does not collect anything while your Mac is off.
What SyncX collects
Your own account
- posts
- replies
- bookmarks
- likes
Public accounts
- posts
- replies
Signing in
Sign in through a dedicated SyncX profile in Chrome, Edge, Brave or Chromium, or explicitly import an existing browser login. Your everyday browser session is never read on its own.
Media
Images are saved on this Mac by default, and videos can be saved per account. Saved files can also live on a NAS. After the original post is deleted, the text, images and videos you saved still open.
Current limits
Deleted, protected or unavailable posts, rate limits and verification challenges can interrupt a run. SyncX shows the real cause instead of retrying every failure.
Take your records with you
How to export Twitter bookmarks to CSV or JSON
Export all collected bookmarks, or narrow the result to an author, date range or search. To export liked posts, choose Likes instead of Bookmarks in the same Source filter.
Filter to your bookmarks
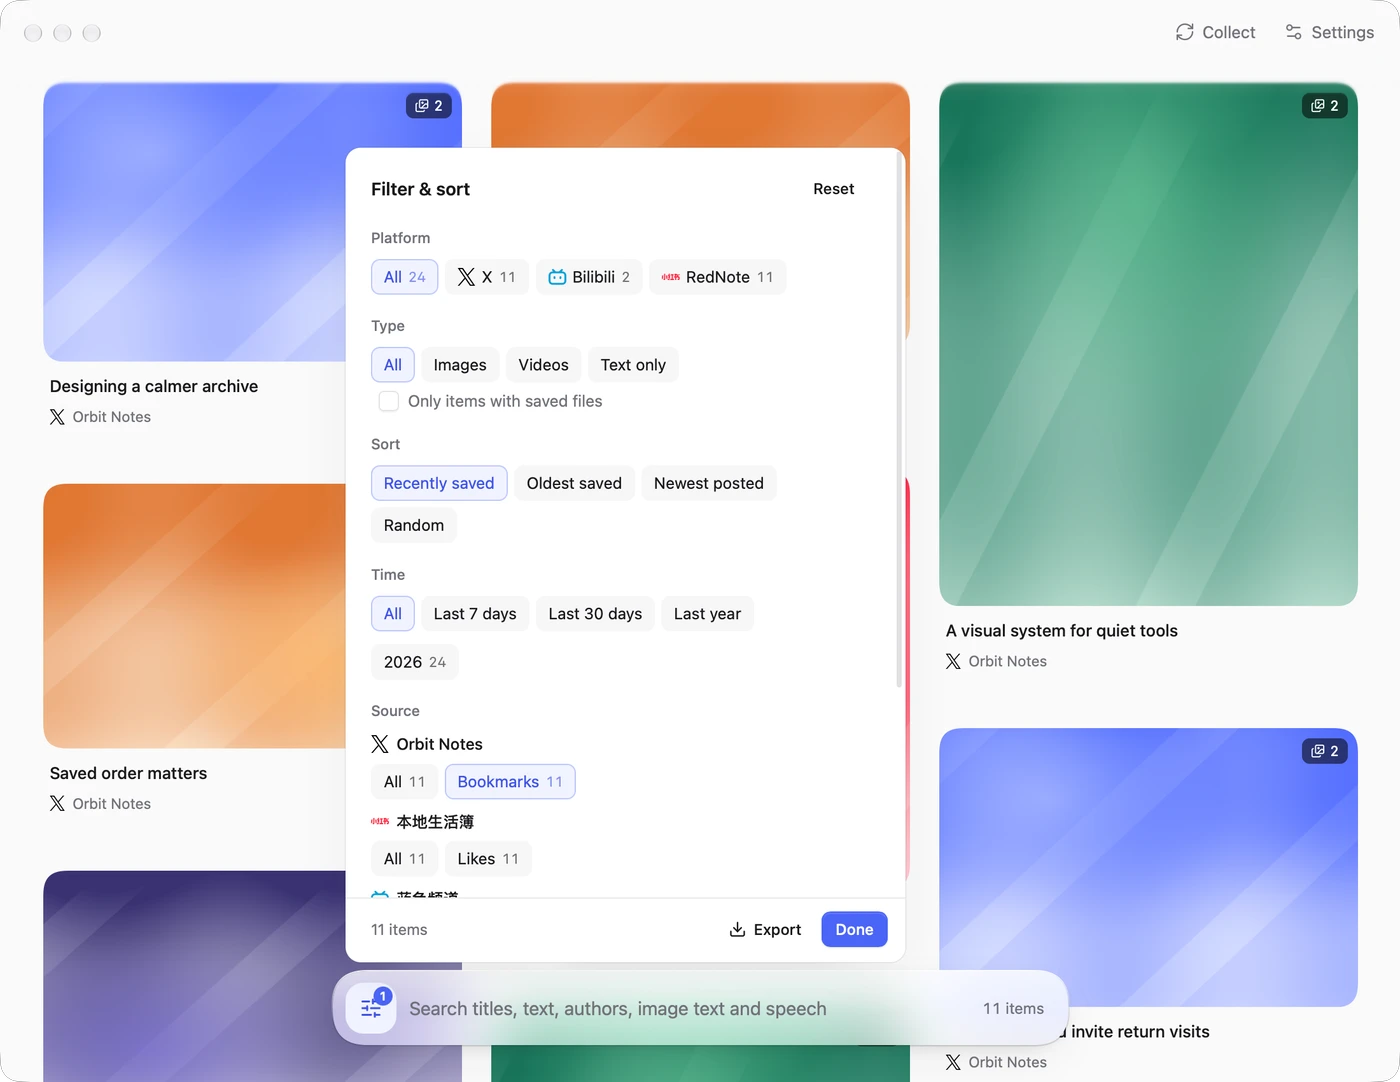
Open the filter button on the left of the library search bar. Choose X under Platform, then Bookmarks under your account in Source. Clear any search or time filters if you want every collected bookmark.
Choose CSV or JSON
At the bottom of the filter panel, open Export and choose Export CSV or Export JSON. The export includes the whole matching result, including items beyond the visible cards.
Save the file on your Mac
Choose a destination in the save dialog. CSV is useful in a spreadsheet: it includes post text, author, original URL and dates. JSON keeps the structured records for scripts and other tools.
CSV and JSON contain records, not bundled image or video files. Keep a separate backup of your library folder and any NAS media. Exporting does not change your bookmarks on X.
Know what you have saved
What can you read after a tweet is deleted?
SyncX preserves what it successfully collected before a post disappeared. Here is what an offline copy actually includes.
| Content | What SyncX keeps | What it needs |
|---|---|---|
| Post text, author and original link | Stored in the local library | The post must have been collected while it was accessible. |
| Images | Files on your Mac or connected NAS | Enable saving images and let the downloads finish. |
| Videos | Files when saving videos is enabled | The download must finish before the video disappears. A link alone cannot play offline. |
| CSV / JSON export | A separate copy of matching records | It contains the collected data; it cannot restore a deleted post on X. |
SyncX cannot recover posts deleted before collection, or media that was never downloaded. Files kept only on a NAS need that NAS connected. Keep backups of your own files too.
How local and NAS storage workFind what you saved again
Search the collected text, author and links, plus words already recognized in images and video speech. Filter by platform, source or date to narrow the result.
Questions
Can SyncX back up my X likes too?
Yes. Enable Likes for your own connected X account in Collect. Liked posts are collected alongside bookmarks and can be searched or exported as CSV or JSON. SyncX cannot collect another account’s private likes; platform limits or unavailable posts can interrupt collection.
Can I export all my Twitter bookmarks at once?
You can export all bookmarks SyncX has collected in one CSV or JSON file. Filter to your account’s Bookmarks, clear other filters, then use Export. Older bookmarks are collected in batches, so wait for collection to finish first. Platform limits or unavailable posts can prevent a complete archive.
Can I search Twitter bookmarks offline?
Yes. SyncX searches the local copy by text, author and link, including text already recognized in images and videos. New collection and remote media still need a connection; files stored on a NAS need it connected.
Can I use Claude Code or Codex with my bookmarks?
Yes. In Settings › Agent, install the read-only syncx command and skill. Your agent can search and read collected bookmarks. What an agent sends to its AI provider depends on that agent’s configuration.
Does it work with public X accounts?
Public-account tasks collect posts and replies only. Bookmarks and likes require the connected account itself.

Like and save as usual. SyncX does the rest.
Free public beta. Your library never leaves your computer.
curl -fsSL https://syncx.cc/install.sh | sh